


PIONEER-FILTER
Whole House Pioneer Lead Reduction Replacement Filter
Special Order
$495.08
Fits the Pioneer PF40 whole house filter cartridge housing.
 Features & Specs
 Features & Specs
Package Qty: 1
Manufacturer: Enpress
UPC: 641945759587
Actual Size (in): 40 inches (Length) x 8 inches (Width)
Media: Activated Carbon
Primary Filter Media: Activated Carbon Block
Operating Pressure (psi): 20 - 125
Operating Temperature (°F): 34 - 120
Operating Temperature (°C): 1 - 50
Brand: Pioneer
Length (in): 40 in
Width (in): 8 in
Maximum Temperature (f): 120
Micron Rating Nominal: 0⋅5
Flow Rate (gpm): 8.0
Includes: One Pioneer Whole House Lead Reduction Filter
 Instructions
 Instructions
- Please read the ENPRESS PIONEER SYSTEM INSTALLATION MANUAL.
Turn off the water supply to the system by shutting off the inlet and outlet valves on the bypass. - Remove Umbrella Cap on the top of the vessel. Replace the 3-AAA batteries with new batteries. Push and hold the reset button on the metered board for 3 seconds to reset the totalizer. When the totalizer is reset the LED lights will flash green 3 times to confirm that it is reset.
- Depressurize the system by pushing down on the red depressurization button on the top cap of the system. Keep the button pushed down until all the air or water pressure is completely released.
- Push down the top cap with both hands to unseat the retaining ring. Remove the retaining ring by carefully grasping the handle and pulling inward, then upward. The retaining ring should slide completely out of the groove.
- Remove the top cap of the system by lifting up on the top handles, remove old filter. Open the John Guest® fitting and shut-off , and flush out the bottom of the system. Look down into the tank assembly, and you should see a small opening centered in the bottom of the tank. Remove packaging from the new filter, place the new cartridge into the tank with the double o-ring facing down.
- Position the cartridge so that it is aligned with the bottom, center opening. Press down on the cartridge so that the double o-ring seal moves into place within the bottom,center opening. Reposition the Top Cap into its original location.
- Reattach the top tank Snap Ring, pull up on the Top Cap to seat o-rings. Turn the water supply on, opening the inlet and outlet valves on the bypass.
- Relieve the system of air in the tank as the system fills with water, by pushing down on the red depressurization button on the top cap of the system. Keep the button pushed down until all the air pressure is completely released, and water comes out of the red depressurization button. Release the red depressurization button.
- Replace the Umbrella cap to the top of the system. Check for leaks.
- Flush the new cartridge per its installation instructions. During flush, confirm green LED lights are flashing with flowing water. If lights are not flashing green, go back to step 2.
 Certifications
 Certifications
 Contaminants Reduced
 Contaminants Reduced

Prop65 warning applies to products that contain carbon media. Click here for more details

Prop65 warning applies to products that contain carbon media. Click here for more details
WARNING: This product can expose you to chemicals including arsenic, which is known to the State of California to cause cancer and birth defects, or other reproductive harm. For more information go to www.p65warnings.ca.gov
Pioneer Filter Information
The whole house Pioneer lead reduction filter is a replacement cartridge for your Pioneer tank system. This filter provides filtered water throughout your home and significantly reduces lead, cysts, and more. Certified to NSF/ANSI standard 53 for substance reduction. Utilizing activated carbon block filtering media, this filter reduces contaminants down to .5 microns in size. The Pioneer filter features a long filter life of over 88,000 gallons of water and is capable of supporting a flow rate of up to 8 gallons per minute so you can ensure that all the faucets in your home are dispensing clean filtered water. Don't let lead, cysts, and unpleasant chlorine taste and odor plague your water. Order your replacement Pioneer whole house filter and drink clearer water.
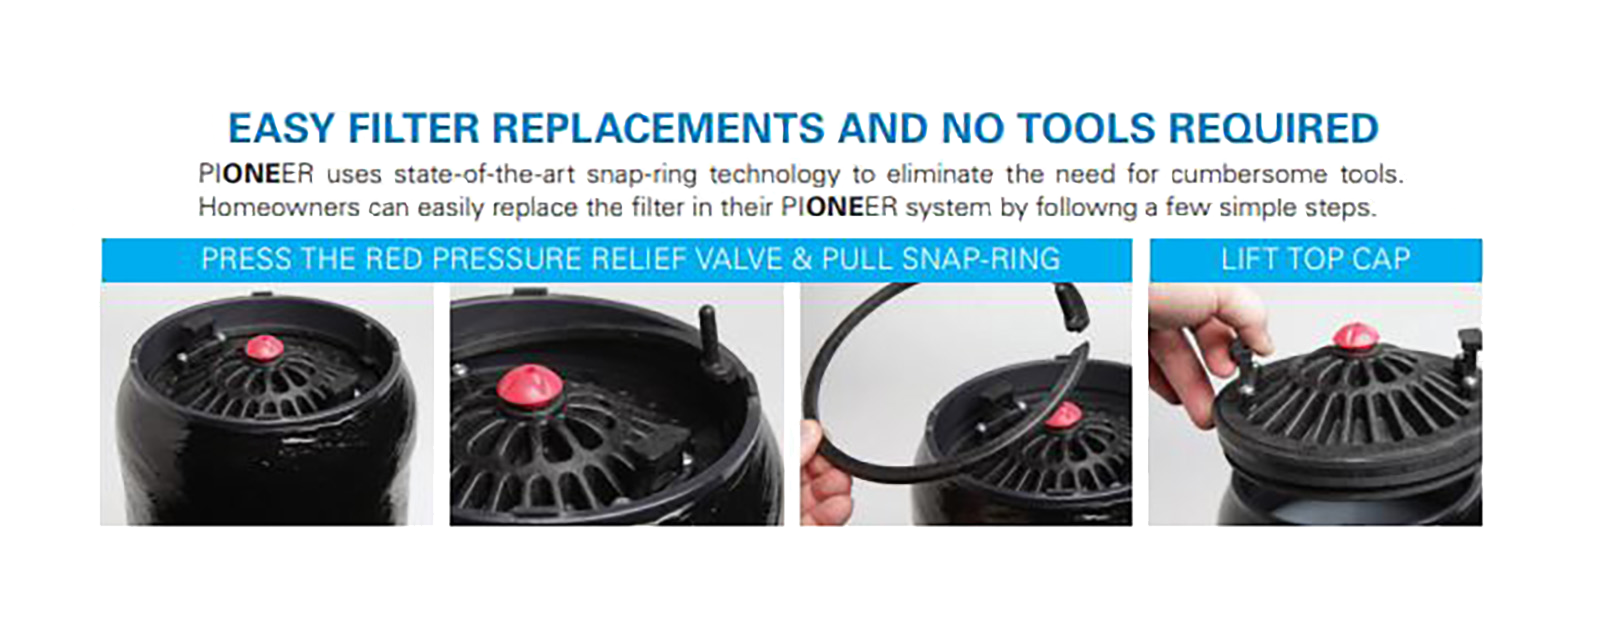
Easy Filter Replacement
Pioneer uses state-of-the-art snap-ring technology to eliminate the need for cumbersome tools. Homeowners can easily replace the filter in their Pioneer system by following a few simple steps. Press the red pressure relief valve and pull up the snap ring. Lift top cap.
The Pioneer filter is a unique replacement filter cartridge for the Pioneer system housing. This whole house filter can be easily exchanged with the existing filter and does not require any additional tools for replacement. Simple step-by-step instructions can be found in the attached user manual above or from the instructions tab. Please read through the steps for proper installation and run water through the system before use to remove any loose carbon fines. Enjoy the hassle-free installation and great-tasting filtered water.
NOTE: It is advised to leave at least three feet of open space above the system for replacement cartridges.
High Quality Filtration
Significant Contaminant Reduction
PIONEER-FILTER is comparable with the following part number(s)
- PIONEER-FILTER
- CT-05-CB-AMYCL
- 641945759587